How to Clean Moldy Gutters and Bricks

Oh, fall! Tis the season for outdoor maintenance, right? I’ve already shared how we did some major pruning in the front of the house (goodbye holly trees bushes).

how-to-prune-for-fall

Now is another fun outdoor home maintenance project – cleaning moldy gutters. Sarcasm intended.

how-to-clean-moldy-bricks-and-gutters

Boo. This is not a project that I look forward to. I shouldn’t complain since we have lovely gutter guards that keeps all debris out of them. So really, I am only talking about the mold that grows between the guards and gutters. Every year a nice line of mold seems to accumulate. It’s probably just me but it feels like it is staring at me every time I pull up to the house. Whew, is it hard to take pictures of mold on gutters. Bare with me here.

how-to-clean-moldy-bricks-and-gutters

how-to-clean-moldy-bricks-and-gutters

Last year, on a whim, there was a beautiful day in October and I decided to clean those gutters. So I drug out a bucket, dish soap, and brush and spent two hours of intense upper body strength scrubbing. They ended up mostly clean and I ended up quite sore.

This year, I decided to try to work smart, not harder. I decided to give the cleaner we used to clean the vinyl siding – Clorox Pro Results Outdoor Bleach.

how-to-clean-moldy-bricks-and-gutters

First, I attached the cleaner to the hose and sprayed down the gutters with the cleaner. After letting that sit a few minutes and work for me, I started scrubbing.

how-to-clean-moldy-bricks-and-gutters

Wah-la! That’s the easy way to clean gutters! It took about 3 passes of spraying down and two rounds of scrubbing.

how-to-clean-moldy-bricks-and-gutters

Here’s a before and after to really see the result:

how-to-clean-moldy-bricks-and-gutters

After:

how-to-clean-moldy-bricks-and-gutters

Then, I was feeling so good I decided to give cleaning the moldy brick that was hidden behind the giant holly bushes.

how-to-clean-moldy-bricks-and-gutters

how-to-clean-moldy-bricks-and-gutters

After checking to ensure that this cleaner was safe for bricks (it was) I did the same process as I did with the gutters. Spray, let sit, scrub, spray, repeat.

how-to-clean-moldy-bricks-and-gutters

how-to-clean-moldy-bricks-and-gutters

how-to-clean-moldy-bricks-and-gutters

how-to-clean-moldy-bricks-and-gutters

After about an hour worth of spraying and scrubbing I came away with clean gutters and clean bricks. What I thought were going to be two big projects turned into one pretty easy project. Now we can hang some Christmas lights (soonish) on this mold free house!

Extreme Fall Pruning Suprises and Tips

Fall…it’s a time for changes, pumpkins, leaves falling, and pruning! Yup, pruning  is right! One of the best months to prune your plants is in October when temperatures are falling. Eric and I had talked about some big pruning plans and lo and behold when I came home from vacation last week Eric had surprised me with this…

how-to-prune-for-fall

Whew! Look at that pile of trees bushes.

Those are the holly bushes that had previously flanked either side of the house. Please, just go with me on the before pictures since I am using ones from other photo shoots since this was a surprise pruning to me.

www.rappsodyinrooms.com

www.rappsodyinrooms.com

www.rappsodyinrooms.com

Spoiler alert: we are having some major tree work done soon (fingers crossed since we’ve been on their list for months), and we thought we would ask them to grind these up when they do the work on the trees. Therefore, they are just hanging out in the front while we wait for the tree guys.

how-to-prune-for-fall

Back to the holly bushes. They were beautiful, especially in the winter with their bright red berries (remember when I used them for table settings?) but the thing is, these boys were just too big for their britches. They had outgrown their welcome…okay now I’m all out of clichés for now. Actually, we were really concerned on how tree-like they were becoming and didn’t want their roots to mess with our foundation. So down they came.

how-to-prune-for-fall

how-to-prune-for-fall

how-to-prune-for-fall

At first I was scared of how it would look. They were so beautiful and green all year round. I was surprised. I LOVE the look. It is so bright and airy now without those heavy weights of bushes. I think they really open up the house and just make it even more welcoming. I’m a huge fan of this change.

how-to-prune-for-fall

how-to-prune-for-fall

It did open up a few more problem areas, like that moldy brick that was previously hidden and the propane tank that was previously hidden.

how-to-prune-for-fall

how-to-prune-for-fall

There will be some cleaning and replanting of smaller plants but for now we are just enjoying these wide open spaces.

Now, for the much anticipated before and after segment:

www.rappsodyinrooms.com

how-to-prune-for-fall

spray-painting-front-lights

how-to-prune-for-fall

Those bushes coming down definitely got me in the pruning mood. I went around and pruned back all of our other bushes (not much to show, just more shape and less scraggle). [Also, am I the only person who feels like they’ve unleashed their inner hairstylist while pruning?] I love it. With that done it’s feeling so much tidier. Well, it will once the big pile in the front is gone. Now it’s just fun to wonder what the neighbors are saying. [Insert evil laugh here.]

In case you are picking up your pruning shears this month, I thought I would pass along some falling pruning tips and tricks that I have learned along the way:

  • If plants are looking dead or diseased, it’s time to just bite the bullet and take them out. They’re not going to make the winter. This gives you time to replant now (October has ideal temperatures and moisture levels for planting bushes) or plan for the spring.
  • I like to prune down plants as much as I am comfortable with. I think it just gives it a cleaner look. So go for it – cut away.
  • Invest in a good pair of shears – and don’t forget that electric tools are handy too! My arms are always killing me after a good day of pruning. There’s no way that regular shears could have handled the holly bushes. Chain saw action all the way! Electric shears are great for shaping bigger bushes.
  • Use Google if you aren’t sure. Have a specific plant that you need to know if you should prune and when? Just Google it. A lot of plants say they have specific times they should be pruned. However, I am an uneducated, lazy, low-maintenance gardener doing the best I can and learning as I go – so I mainly do one good pruning in the fall. It works for my house and my life.

Blogger Feature: Involving Color and Involving Home

Hi everyone! I’m back with another blogger feature! I just love sharing all the wonderful bloggy goodness out there (especially when I know these lovely ladies). I’ve already featured Jackie from Teal & Lime and Megan from Two Live Colorfully. Now I’m back with Jena who hosts two incredible blogs: Involving Color and Involving Home.
involving-color-logo
involving-home-logo
I also met Jena at Haven, albeit the last day but I’m glad I did. We’ve also stayed in touch, and I’m glad to have her on the blog today. Let’s learn a little bit more about Jena!Could you tell me about what inspired you to begin your blogs Involving Color and Involving Home?
After we bought our home in 2009, I was spending tons of time researching paint colors. It was an obsession, really! I kept wishing there was a better resource out there that focused on paint color inspiration. While sitting in traffic on my way home from work one day, I thought, hey, why don’t I do that? So Involving Color was born and I started posting rooms from bloggers and readers along with their paint colors and organizing them in an easy to browse format. I also started posting my own home projects on there as well, and eventually created a second blog, Involving Home, to share all of my home projects, recipes, and tips.
involving-home-dining-room (500x375)
Where did the names come from?
I came up with Involving Color first. I was brainstorming blog name ideas in the shower (isn’t that where all the best ideas are born?) and the name Involving Color hit me. I liked that it was descriptive of a color blog, but left it open to explore more than paint color someday. I came up with Involving Home second as a spin off of my first blog.

involving-home-living-room (500x375)
What is the project you are most proud of?

That’s a tough one. I think there are two that are tied. Our kitchen because we DIYed the whole thing on a super tight budget, and I’m really proud of all of the work we put into it. The second is our hallway bath because I spent SO much time planning it and choosing materials. The kitchen was a more labor intensive project DIY-wise, but the bathroom, while small, was much harder for me to design. I’m happy both turned out even better than I hoped.

KitchenStraightEdited-involving-home (454x605)
Florim-Stratos-Avorio-12x24-tile-with-Sherwin-Williams-Sea-Salt-walls

What is your best DIY tip for readers?

Patience! I find that projects always seem to take longer than expected, and there always seems to be at least one thing that doesn’t go as planned. In most cases for me, lots of things don’t go as planned. I’ve only been really DIYing for about 4 years, and I think that each project goes smoother and smoother.

hydrangeas-patio-involving-home (454x605)
What is your most read project?

By far, my no sew roman shade from a mini blind. I love roman shades, but they are expensive to have made and beyond my sewing capability. I love the no sew shade concept because anybody can do it, and it really looks great in person!

mini-blind-involving-home (457x343)
Would you mind sharing a DIY blunder? Sometimes those are the best stories. 🙂
Blunder? What? I never mess up.

Kidding!

I mess up DIYing, well, constantly. And I think it’s all part of the fun. At least I tell myself that afterward when I calm down. I actually just shared one about our half bath tile floor and how the space I left for the marble threshold was just a tad too small. I ended up sanding, yes SANDING the marble to make it fit. I was too scared to try cutting it since I feared it would chip, and it was only off by a small amount. Still, it took a lot of elbow grease, but it eventually fit. Then it got stuck when I was testing the fit and I had to pry it out with a grilling skewer, which also made me slightly chip one of the tiles. It worked out in the end, though 🙂

12x24-tile-with-marble-threshold
Where is the weirdest place you have ever blogged?

Probably from an elliptical at the gym using my phone. I do this a lot! I’ll respond to comments and social media, and I’ve even linked up to linky parties, which works surprisingly well on the phone.

Can you provide some words of wisdom to other DIYers?

I firmly believe anybody can DIY, especially ladies! I think there are still a lot of stereotypes about using tools, fixing things, and building things. I still get many looks and exclamations of surprise when I tell people I do most of the DIY work in our home including most of the assembly of things, minor electrical and plumbing, woodworking, tiling, molding, and so on. And that’s not to say my husband doesn’t do a lot around the house (he does a ton), but I do many of the things that I think are stereotypically male jobs. I am on a mission now to encourage and empower more ladies to do these things if they want to or feel like they might be good at it. So, ladies, yes you CAN do these things!

How-to-cut-installed-laminate-flooring

What is your favorite way to spruce up a room without spending any money?

Hmm probably cleaning up all the projects I’m working on that are laying around. Or finish them! Half finished projects are practically a permanent fixture of my decor. I feel like I always have multiple half finished projects and all of their supplies and tools laying around. Guests come over and tell me our house is so clean. I just tell them to not go look in the third bedroom where I just stashed all that stuff 😉

Aside from that, I love switching up the accessories from room to room. They always look new and fresh to me in a different space.

spoon-rest-involving-home

Thanks so much for sharing all your favorite projects and wonderful tips on DIY. I think it is awesome to hear stories from a woman who does the grunt of the DIY work in the home. You go girl!

There is SO much to see when you look around her blog. Here are a few of my favorites that I have found:

No Sew Table Runner

no-sew-runner-involving-home
Using a Dining Room as an Office

Dining-Room-and-Office-Combo_thumb
How to Combat Drywall Anchor Frustration

How-to-install-better-drywall-anchors

Seeds to Sew International

If you’ve been following me on Instagram, you noticed that I jetted out of little ole Lynchburg and headed to bigger cities. It was my yearly trip to visit my mom in New Jersey, which sometimes includes a trip to NYC. We had an amazing time of seeing beautiful buildings, beautiful plays (Wicked on Broadway is amazing), and beautiful people.

new-york-city-bryant-park

new-york-city-bryant-park

new-york-city-public-library

wicked-broadway-new-york-city

We also had the beautiful opportunity of visiting the store Seeds to Sew International.

seeds-to-sew-international

Seeds to Sew is an incredible non-profit that is all about empowering women in Africa. Their mission is to “improve the lives of women and girls in disadvantaged communities through education and job skills training.   [The] goal is for the women and girls in our program to use these job skills to make money and support themselves and their communities.”

seends-to-sew-international

The store we visited sold the products that the women made and shipped back to the States. Yes, we’ve all seen the also wonderful chain stores that sell all fair trade and handmade items from Africa, but these items hit closer to my heart. They have no feel for anything mass produced. They are all one of a kind and such unique products.

seends-to-sew-international

Their main products are fabric reusable bags called Enkiteng bags. Basically, they are a rectangular fabric bag with a ribbon sewn across the top but they go far beyond basic. They are marketed as eco-friendly, user-friendly, reusable gift bags that have no waste. These bags hold so many opportunities – opportunities on how to use them and gift them but more importantly opportunities for the women in disadvantaged, war-torn, and poverty-stricken areas of Africa who make them to actually build a life for themselves.

seends-to-sew-international

seends-to-sew-international

It was so much fun to visit the store and hear the first-hand accounts from the woman working there. She is one of just a handful of people who run the organization. They all have full-time jobs but this is their passion. You can just feel the love, generosity and heart that pours through them as they explain their mission. They tell the success stories of women who are now strong enough to stand up to their husbands, women who can buy their own land and home now (unheard of there), women who have a skill that will allow them to be independent and to be able to provide for their family. Women who are self-sufficient and powerful. Yes, we talk all about women empowerment here in the United States but the degree that is needed in these areas of Africa is extreme.

seends-to-sew-international

seends-to-sew-international

We aren’t talking glass ceiling here, we are talking about regular human rights. These women don’t choose anything about their lives or their bodies. They are subject to polygamous marriages and brutality. Through teaching them a skill they are able to stand on their own two feet they are able to survive.

seends-to-sew-international

seends-to-sew-international

The store also sells beautiful beaded necklaces, bracelets, earrings, and belts. This is another program that they have set up in a different village.  Baskets are also sold that represents another village. These items are beautiful and hold so much meaning in each one.

seends-to-sew-international

seends-to-sew-international

My mom and I first stopped by JoAnn Fabrics to buy yards of fabric to donate. Isn’t it fun to think about them traveling all the way to Africa, being sewn by these wonderful women, and then traveling all the way back here to end up as wrapping paper for gifts? Then we spent an hour at the store pouring over the various bags while listening to the incredible story of this organization. We had so much fun picking bags that would be gifted back and forth between our families. Although, a few of my bags may end up staying in the house as laundry bags, travel bags, etc. They are just too pretty!

seends-to-sew-international

seends-to-sew-international

seends-to-sew-international

So now that I have gushed on and on about this wonderful organization and its products, don’t fret that you can’t travel to New Jersey to snatch up these great products. You can visit their online store here and order these amazing bags, jewelry and baskets yourself. Or you can also give a donation as well. I highly encourage you to check out this amazing organization that is small yet powerful.

Painting a Chair Cushion

I have a hard time getting rid of anything that is still functional even if it isn’t the prettiest anymore (at least not to me). I think that’s why furniture painting is something that has always intrigued me. I love that it offers an option before the upholstery shop. It sounds a little scary, and I’m was more than a little dubious to attack a sofa with a paint brush so I decided to start small. Small as in this cushion for the rocking chair in the sun room.

painting-upholstery-chair-cushion

painting-upholstery-chair-cushion

painting-upholstery-chair-cushion

The rocking chair itself is a family hand-me-down which I love. I think it’s great! Unfortunately it had a mishap at one point and the seat looks like it’s trying to flush you out of it.

painting-upholstery-chair-cushion

painting-upholstery-chair-cushion

A cushion was then purchased for it and this is how it came to me. The best solution would probably be to recane it (is that what repairing the seat is called?) but it’s so comfy with the cushion so I tried to just make a change to the cushion. I decided to paint it!

Here are the supplies I needed:

  • Foam paint brush
  • Paint (I used Valspar Duramax color matched with Pantone Emerald Green since I had it leftover from the emerald and gold table)
  • Fabric Medium (purchased at a craft store)
  • Measuring cups
  • An empty glass container
  • A spray bottle

painting-upholstery-chair-cushion

The process is very simple. First, mix up your paint mixture. I used a 1:1:1 mixture of paint, fabric medium, and water. I mixed it in an old food glass container since I knew I would need it over the course of a few days as I coated (and recoated) the cushion.

Next, spray down the cushion with water. Then start painting the cushion in thin coats.

painting-upholstery-chair-cushion

This takes many coats and patience, although it probably varies for each project. Mine had a darker pattern which is probably one of the hardest things to cover up. I can’t even tell you how many coats it took. It took a lot. I would wait at least an hour between coats. Sometimes more depending on my schedule.

painting-upholstery-chair-cushion

Once it is sufficiently coated on both sides you really want to give it time to dry. Like a lot of time. Make sure this is dry before putting it on your furniture!

painting-upholstery-chair-cushion

painting-upholstery-chair-cushion

I love how it ties in the green table. I think it looks nice with the wooden rocker.

painting-upholstery-chair-cushion

painting-upholstery-chair-cushion

painting-upholstery-chair-cushion

painting-upholstery-chair-cushion

painting-upholstery-chair-cushion

The cushion had a soft cotton feel to it before it got painted. It definitely feels coarser now, like an outdoor polyester fabric. That really doesn’t bother me since it is probably better this way for outdoor furniture. However, I wouldn’t want this for a comfy living room chair.

Now I know I am going to get questions about what I am going to do with the actual chair. The answer is nothing…for now. As I mentioned before it was given to me by family – meaning, I feel a lot worse about permanently changing it with something like paint. I would probably (although not definitely) paint it in a second if I had just scooped it up at a thrift store but this piece has to go through family approval. It has been approved for stain but I’m not sold. I actually like it light as is, so stain would just make it darker. Although perhaps a nice gray wash stain would look nice? See, I’m rambling off various ideas. So the chair stays as is…for now!

Just to finish off the post, here is the delightful before and after:

painting-upholstery-chair-cushion

painting-upholstery-chair-cushion

From Black to Blue Entertaining Table

One day long ago in the spring I woke up one fine Saturday morning, threw open the shades to a beautiful day and spied a neighbor’s yard sale. Clad in my PJ top and jeans (gosh I’m classy), I gleefully cantered down to their front yard. Time to forage their cast-offs!

This all came home with me (excuse the Instagram picture):

yard-sale-finds

I call that a pretty good yard sale!

The black table lived in the new sun room setup for a while as the other pieces were coming together.

www.rappsodyinrooms.com

Finally, it was time for the black table to have its time in the limelight. The black was okay in the room but I wanted to bring in more navy (since the back door is navy and the plastic stuffed pillows had navy patterns in them). The other side of the room needed more. Navy it was!

styling-a-side-table

I like it! It’s a fun pop of color and brings the navy all around the room. Yes, sometimes it looks purple but I’m just going with it.

styling-a-side-table

Now time for the fun part – styling! You’ve seen me challenging myself to get better at styling (like when I styled the love seat four different ways and how I styled the yellow grilling cart) so I once again set out to do my styling best.

As you saw in my Instagram picture I grabbed an antiqued mirror at the yard sale for the top (although they didn’t come together – I actually grabbed them on separate sides of the yard sale). The washi wrapped votive holder topped that.

styling-a-side-table

styling-a-side-table

Then the salvaged tray was the shelf for the bottom.

styling-a-side-table

This is where I really had fun playing. I see this as an entertaining tray where I can put out drinks and appetizers so I didn’t want to style it too much so it could be flexible for entertaining, but I also couldn’t have a blank space.

I first raided our kitchen shelves and brought out a beautiful pitcher and glasses we got for our wedding. It’s much better to be able to see them every day instead of having them shut behind closed doors. Then I grabbed a picture and fake succulent to round out the tray.

styling-a-side-table

styling-a-side-table

styling-a-side-table

styling-a-side-table

Now I have a lovely little landing space for drinks to sit and a versatile tray that can move from tray to table to outside for entertaining during the good weather.

Tray Makeover: From Ugly, To Uglier, To Beautiful

You know when you have an image of something in your head and you know it’s just going to be beautiful? Oh the anticipation, the excitement, the delight when you find it! It’s perfect! Is that reality? Not all the time. Nope, definitely not. This, my friends, is a story of a project gone terribly, terribly wrong  (have I emphasized that enough?). Thankfully, there is a happy ending with a great recovery.

It all started with a simple black tray from Goodwill.

tray-transformation

It wasn’t bad as is, but it did have some paint discoloration on it. I knew it could be better. My plan was to have it as the second shelf holder on the black table in the sun room.

www.rappsodyinrooms.com

Perfect right? Except it needed to be prettier. My plan was to draw in the colors of the sun room with the tray. I went all over the color palette of the room trying to decide which color to paint the tray. I ultimately decided I wanted to go yellow.

tray-transformation

tray-transformation

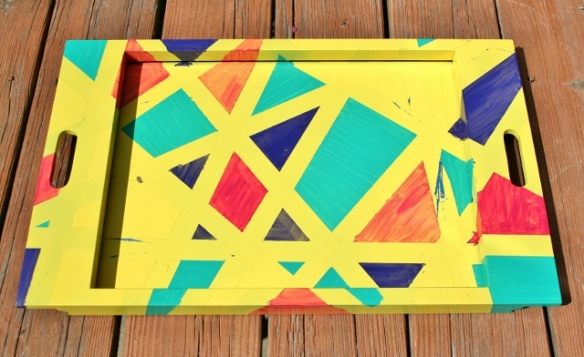
I was pretty happy with the yellow as-is. But I thought it would be fun to bring in even more colors and some geometric shapes. This is where it goes downhill fast.

I used painters tape to randomly tape out a fun little pattern.

tray-transformation

Then I took the remaining sun room colors to fill in the geometric shapes. That way when I pulled away the tape it would be pretty colors with yellow lines surrounding them.

So I got down to crafting. Thankfully good sense surfaced in enough time to yell at me, “STOP!”

tray-transformation

Yup, halfway through I knew there was no salvaging this idea. It literally looked like the worst 80’s craft project gone so wrong. I mean, it was TERRIBLE. I’m not ashamed to say that first and loudest. What was I thinking? It was all wrong – so wrong!

Down went the paint brushes. I tried to rub the paint up with a wet cloth.  Nope, too dry. So I let it dry completely.

Then the failed project failed some more. When I went to pull the paint off the next day it became an even bigger mess. The tape didn’t come up well. It left spots. It pulled up the original black finish. It wouldn’t have worked in the first place. It was bad, people, bad.

tray-transformation

I set to sanding it down in hopes of getting rid of all the paint edges and lines. It sanded down pretty well.

tray-transformation

tray-transformation

I then decided to take it to a manageable base where I could reimagine the project. On went the white spray paint.

tray-transformation

You could still see the geometric lines now but I actually kind of liked that white on white pattern. But it was too much white. So I decided to keep it white and put paper on the bottom.

tray-transformation

I planned to Modge Podge it down (hence the pictures with Modge Podge) but miraculously it had some static cling to it that kept it in place.

tray-transformation

Now this is more like it.

tray-transformation

tray-transformation

I thought this tray was destined for the trash (as it wasn’t even worthy enough to go back to Goodwill) but I am so pleased with how it turned out in the end. Yes, I say that’s a point for the comeback kid. So everyone, the lesson here is to never give up, even if your first idea tanks, there is still room for beauty to emerge!

Styling the Yellow Grill Cart

Remember when I bought a pretty little yellow cart at an antique shop earlier this summer? She had pretty retro lines and sparkly wheels and was destined for the sun room.

styling-a-grill-cart

styling-a-grill-cart

styling-a-grill-cart

Well she was pretty all on her own but I needed her to pull a little bit more weight. My idea in buying her was for her to have a multi-function job. I saw her working as a side table in the sun room, holding drinking, magazines, and other pretty things. I also saw her as being wheeled out onto the deck when we need a surface for grilling. Then, when I made the charcoal holder from a popcorn tin, I knew that the yellow cart would hold that too.

So I do whenever I start styling something – I gathered a huge pile of possible items to work with.

styling-a-grill-cart

Then I just start playing with what looks good, all while keeping in mind what I saw the car functioning as. After a little while I hit upon a pretty and functional style that sat well with me. So much that I sat in my loveseat and just stared at it smiling. I know when that happens that it works.

styling-a-grill-cart

styling-a-grill-cart

The first shelf holds a lantern (from the clearance section in Michael’s) with a Dollar Store candle that I wrapped washi tape around to dress up.

styling-a-grill-cart

styling-a-grill-cart

The “R” was also from the clearance section in Michael’s. I wanted a coaster for the cart so I decided to Modge Podge the “R” and use that as a coaster.

styling-a-grill-cart

The frame was $0.45 at a local thrift store. I really dove into the archives for the family picture from the 90’s. It was my first trip out of the country. The whole family went to England and Scotland. Ah the fashion and hair in this picture. Amazing.

The succulent pot was from a yard sale with a clearance succulent from Lowe’s.

styling-a-grill-cart

The middle is a stack of magazines for easy reading while lounging on the love seat. The wooden buffalo was a thrift store treasure that I fell in love with immediately.

styling-a-grill-cart

styling-a-grill-cart

styling-a-grill-cart

styling-a-grill-cart

The geometric bin was a $1 find at Wal-Mart of all places. It’s empty right now but I’m thinking it will hold napkins for parties out there. The colors were just so perfect for the room (and they were such a good deal I bought $4…not sure where they are going to go).

styling-a-grill-cart

The last shelf holds the charcoal container.

styling-a-grill-cart

styling-a-grill-cart

styling-a-grill-cart

There it is, my styled yellow cart! I’m working on paring things down and not over styling. I like that there are interesting items on the cart but it’s not too much. Do you have any styling tricks?

Sharing This Post Here:

Popcorn Tin to Charcoal Bin

My goodness, I love the possibilities that a popcorn tin holds. First, it holds hundreds upon hundreds of delicious kernels of joy. Yum. One of my favorite parts of the holidays. But then it gets empty and then what? Joy over? No my friend, no! You saw I already made one can into an organization holder for my closet makeover. Now I have another use for one:

popcorn-tin-upcycle-charcoal-holder

Yes, I am making a charcoal bin out of a popcorn tin. Rhymes help motivate me. We like to keep it old school with using a charcoal grill.

charcoal-grill

Our charcoal floats around the house. It usually lands by our back door by our kitchen table. Sometimes it floats in the sun room (but not recently since that room is too pretty for it now). Other times it gets left out in the rain (oops) where I later find it ruined and make some of my own flames with my anger (that stuff is expensive!)!

I decided in my sun room planning that we were to have a cart that would be wheeled in and out of the sun room for easy grilling. And on that cart I was determined to have the charcoal. Except for charcoal bags are ugly so I was determined to have a pretty charcoal container. Enter, my co-workers empty popcorn tin (since mine had already been used).

popcorn-tin-upcycle-charcoal-holder

This time the can got coated in navy blue paint.

popcorn-tin-upcycle-charcoal-holder

After that dried I attacked it with washi tape again (see, I told you Wednesday it was here to stay) around the top of the container. The width was just perfect.

popcorn-tin-upcycle-charcoal-holder

Then I was so excited to try out this product: clear chalkboard paint. Hurray!

popcorn-tin-upcycle-charcoal-holder

I did my happy dance in the middle of Michael’s when I spotted this. I love chalkboard anything but don’t love the black look or don’t get excited about having to try to make some. This just coats right over any surface and dries clear!

According to directions you apply one coat horizontal and one coat vertical (with an hour dry time between). I did that, waited until it dried, and then taped out a border for it (yes, in washi tape) so it looked more like a label. Then, I put one more coat just to make sure. It’s easy to doubt this stuff since you can’t see it (and therefore I don’t know if it is working or not).

After that cures for 24 hours you need to ready the surface by rubbing chalk all over it. This way your first drawings on it won’t be permanently ingrained in the surface (knowing me the first marks would be hideous looking letters).

popcorn-tin-upcycle-charcoal-holder

Then you are all set to go! Draw away!

popcorn-tin-upcycle-charcoal-holder

popcorn-tin-upcycle-charcoal-holder

popcorn-tin-upcycle-charcoal-holder

popcorn-tin-upcycle-charcoal-holder

popcorn-tin-upcycle-charcoal-holder

popcorn-tin-upcycle-charcoal-holder

Goodbye ugly charcoal and hello pretty container! Even if we leave it out in the rain it’s safe. Now, no surface is safe from my chalkboard paint obsession!

Sharing This Project Here:

Washi Tape Votive Candles

Washi tape, washi tape, everywhere! Basically, that’s what I see, from walls to toe kicks this is a trend that is sticking (hah). Since it can come in so many different colors and patterns, it’s also a trend that can adapt to other trends. So I am embracing one roll at a time.

Through my meanderings through Pinterest the other day I hit upon this votive idea that I thought was too cute – she wrapped washi tape around votive candles to spruce them up!

I also thought it would be a great fit for a votive holder that I have hanging around the sun room.

washi-tape-votive-candle

washi-tape-votive-candle

So out came my collection and in no time these  candles were wrapped in beautiful paper tape (which is all washi tape basically is).

washi-tape-votive-candle

washi-tape-votive-candle

washi-tape-votive-candle

washi-tape-votive-candle

After I finished making these  candles oh so pretty, I put them back into the holder – sans blue rocks this time. It showcased the beauty of them so much more.

washi-tape-votive-candle

washi-tape-votive-candle

washi-tape-votive-candle

washi-tape-votive-candle

Boom. Done. Now that’s a quick and easy project!