Snickerdoodle Brownies

You know this dessert is going to be de-li-cious because I am featuring a non-chocolate dessert. That’s a big deal coming from a choc-a-holic like me. Most of the time if it isn’t chocolate I don’t even consider it a real dessert. But these snickerdoodle brownies are definitely a real dessert…that you can’t stop eating. Actually, they were nick-named the “devil brownies” at work because people couldn’t stop eating them. Not only is this a delicious dessert with ingredients you probably have already at home, but I also found that with a few small tweaks to the recipe you can make it like brownies, gooey candy, or coffee cake.

www.rappsodyinrooms.com

Original recipe found from My Own Sweet Thyme

Ingredients:
2 2/3 cups all-purpose flour
2 teaspoons baking powder
1 teaspoon salt
2 cups packed brown sugar
1 cup butter, at room temperature
2 eggs, at room temperature
1 Tablespoon vanilla
2 Tablespoons white sugar
2 teaspoons ground cinnamon

www.rappsodyinrooms.com

1. Preheat oven to 350 degrees.  Lightly grease a 9 x 13 inch baking pan.

2. In a medium bowl, whisk together the flour, baking powder and salt.  Set aside.

www.rappsodyinrooms.com

3. In a large mixing bowl, beat together the butter, brown sugar, eggs and vanilla until smooth.

www.rappsodyinrooms.com

4. Add the flour mixture to the egg mixture and beat until well blended.

www.rappsodyinrooms.com

5. Spread the batter evenly in the prepared pan.

www.rappsodyinrooms.com

6. In a small bowl, combine the white sugar and cinnamon. Sprinkle the mixture evenly over the batter in the baking pan.

www.rappsodyinrooms.com

7. Bake for 25 – 30 minutes or until the surface springs back when gently pressed.  Remove from oven and let cool slightly on a wire rack. While still warm, cut into squares with a sharp knife.

www.rappsodyinrooms.com

Megan’s Tips:

  • To make more cakelike brownies (almost like a coffee cake) use egg substitute and margarine.
  • To make chewy brownies use real butter, real eggs, and sift the flower mixture.
  • To make more candy-like brownies, use 1 1/3 cups of flour.

www.rappsodyinrooms.com

Quadruple Layer Chocolate Cake

Four layers of chocolate cake with a homemade buttercream frosting between them and a chocolate ganache and toasted almonds to top it off.

www.rappsodyinrooms.com

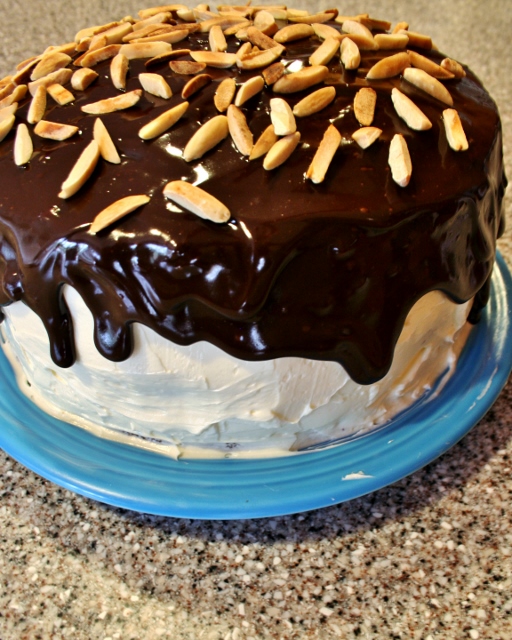
It really doesn’t get better than that. Oh the happiness of eating that cake was pretty tremendous. Thankfully, it wasn’t a cake that was going to be sitting around our house, because I would probably be writing this with an extra 20 pounds attached to me. This one put on its business suit and traveled down the road with me to work. We definitely like to eat for any occasion celebrate birthdays at work, so we knew we had to do it up big when my boss’s birthday came up. You know, go big or get fired go home? Kidding! My co-workers and I used the excuse to peruse our dessert Pinterest boards and came up with what the pinner called a Ho Ho Cake. I gladly accepted/volunteered for the task of making the cake.

www.rappsodyinrooms.com

Warning: this cake will take some time. I decided to split up the cake making process over a few days so it would be enjoyable and not the cake that never ended that I was so tired of making that I wanted to smash it in someone’s face instead of eat it.

www.rappsodyinrooms.com

First I made the cakes. The original recipe called for making three layers of homemade devil’s food cake. I decided to make four layers from two box mixes. Call me a cheater. I call myself a time saver. Tasted great to me!

www.rappsodyinrooms.com

Then I made the buttercream frosting. This was my first time making frosting and I was a little bit nervous but it was a piece of cake (err…that’s a confusing statement). All you need is lots (AND LOTS) of butter and sugar. Sometimes it really best not knowing what is in something.

Then you make the chocolate ganache and toast the almonds. I never knew what was in chocolate ganache until now. Once again I will say it’s better not knowing sometimes!

www.rappsodyinrooms.com

Then it all comes together into a wonderfully tall and delicious and beautiful cake! I was quite proud of this one. Oh, and it tasted so. darn. deliciously. good. Best.cake.ever. I’m. still. craving. it. Okay. I’ll. stop.

Thankfully, everyone agreed with me and the cake and birthday celebration were a success! I would definitely think about making this one again for a special occasion!

Cake Ingredients:

  • 2 devils food cake mixes (and the oil and eggs to make them)

Buttercream Ingredients:

  • 5 cups confectioner’s sugar
  • scant 1/2 cup hot/boiling water
  • 1 teaspoon vanilla extract
  • 1/4 teaspoon salt
  • 2 1/2 cups (5 sticks) unsalted butter, softened

Chocolate Ganache/Topping Ingredients:

  • 1 cup semi-sweet chocolate chips
  • 1/2 cup whipping cream
  • Sliced Almonds

Directions:

1. Preheat the oven to 350 degrees Fahrenheit.  Butter three 9.5 inch cake pans.  Dust with granulated sugar.

2. Make the cake batter: Make the batter according to package directions.  Divide the batter between the prepared pans and smooth the tops.

3. Bake the cakes: Bake the cakes until according to package directions.  Cool in the pans on cooling racks for 15 minutes, then invert the cakes onto the cooling racks and cool completely. I only had two pans so I made one box, let those cool, and then made the other box and baked.

4. Make the buttercream: Put the confectioner’s sugar in a large mixing bowl.  With the electric mixer running on its slowest speed, slowly add in the hot/boiling water.  Then add the vanilla and salt and mix well.  Add the butter and continue mixing on slow for about 20 seconds.  Increase the speed to medium-slow and mix for another 20 seconds.  Then turn the mixer to medium-high and let the buttercream mix for 15 minutes.

5. Begin assembling the cake: Place one cake layer on a platter, bottom side up.  Spoon a quarter of the buttercream over the cake, spread evenly to the edges.  Top with a second cake layer, bottom side up.  Spoon the same amount of buttercream over the cake layer, spreading it evenly to the edges.  Do this with the third layer as well. Top with the fourth cake layer, bottom side down. Then use the last of the buttercream to smooth it around the sides.  Chill the cake for about 30 minutes before adding the chocolate ganache.

6. Make the toasted almonds: In a medium pan, dry toast the sliced almonds over medium-high heat until slightly golden.  Transfer to a cool plate to prevent the nuts from continuing to cook.

7. Make the chocolate ganache: Place the chocolate in a medium-size bowl.  In a small saucepan over medium high heat, bring the cream to a strong simmer.  Remove the cream from the heat and pour it over the chocolate chips, and let it stand for a couple of minutes.  Then slowly stir, or whisk, the chocolate and cream together until it is smooth and glossy.  Let the ganache rest for 10 minutes before using it to glaze the top of the cake.  Sprinkle the toasted almonds on top of the cake.  Let the cake chill briefly before serving.

8. Finish assembling the cake: Spoon half of the ganache on the middle of the top layer of cake.  With the back of a spoon, slowly spread the ganache over the top of the cake.  Spoon the rest of the ganache onto the middle of the top layer of cake.  Use the spoon to gently spread the ganache so that it begins to spread over the sides of the cake and down the sides.  Sprinkle with the toasted almonds.

Then eat and enjoy! It definitely is a great cake for a party or another fun occasion!

www.rappsodyinrooms.com

Side note: The picture of the ¾ devoured cake were taken at work, since I didn’t think it would be cool to take a slice out to photograph it before it made it to work. Everyone got a kick out of the fact that I brought the camera to take pictures of just the cake, not the birthday celebration itself. Sorry boss! Your birthday really was all about the blog. Cause that’s how I roll and he knows it. I mean, I literally ran out of the room the moment he walked into it for his birthday celebration. It was just because I forgot the card. After one bite of cake, I’m pretty sure he forgave me.

Holiday Treats Round-Up

Hey everyone! Are you as busy as I am right now? Even with all my early planning and stress-free holiday season practices, it just gets busy with the last minute cleaning, cooking, and shopping. But I wouldn’t change it for the world because this time of year is just full of warmth and love…oh and lots of sugar to give you those energy spikes! So with that in mind, I thought I would share some of my favorite past dessert recipes from the blog.

Peanut Butter Fudge

www.rappsodyinrooms.com

It’s a great go-to recipe that makes a TON! It is great to have on hand as last minute gifts (like someone showing up at your door and giving you a gift). You can just keep some in a pretty little mason jar or Christmas tin and it’s ready to go! It is also great for parties – small and easy to eat by hand.

Christmas Cookies

www.rappsodyinrooms.com

So easy and a fun family activity. It didn’t go all that way last year when I lost patience and tried to cram every holiday tradition into a week, but no matter what they look like, they are delicious! Try it with different colored sprinkles or colored icing. (Wow – That was one of my first posts! I’m still not the best as food pictures, but I think I have come along way. It’s fun to see the progress!)

Peanut Butter Chocolate Chip Ball

Recipe: Peanut Butter Ball

A huge crowd pleaser to bring to a party and very easy to prepare. It’s presentation definitely will wow people but it is way too delicious to keep in that pretty ball. Serve it with graham sticks or chocolate teddy grahams!

So there are my top three holiday treats for parties, presents, or just fun time with the family! Hope everyone has a wonderful weekend before Christmas!

Recipe: Peanut Butter Ball

Mmmm peanut butter and chocolate. My all time favorite combination! Now add-in cream cheese…maybe a new favorite in the line-up. In one of my late night browsings of Pinterest (anyone else seem to get addicted to this only late at night?!) I stumbled upon a delicious peanut butter ball recipe from Buns In My Oven. Think of a cheese ball but dessert style. Oh yes. So when we were invited to a game night the other weekend I new I had to bring this little ball of yum. Such a good decision.

Such a great party food for a laid back snack, talk, and play party. This is it pre-party and I brought it with chocolate animal crackers and graham cracker stick dippers.

I didn’t actually get any of the full set-up of the dips with the ball at the party. I thought about ripping open the bags and staging the whole thing in the house, but then I thought it would be tacky to bring open bags of goodies to the party.

However, my mom came to visit and I took the opportunity to share this recipe with my mom. Note: My mom taught me everything I know about sweets. I blame her for my incredible sweet tooth and am so thankful for that. We have also made many, many sweet memories over sweets. 🙂 I did get a few “action” shots before this ball was devoured. Just barely though…

Yes, after a short while this is what your hard work will look like. A sad little remnant on the plate. Yet still quite delicious.

Here is a closer picture so you can see the texture of what it is like inside.

I highly recommend the chocolate animal graham crackers as a dipping apparatus. They add the perfect taste and whimsy to this snack. (Confession, this picture was taken around 10am. I actually did eat that bite!)

Peanut Butter Ball

Ingredients:

  • 8 ounces cream cheese, at room temperature
  • 1 cup powdered sugar (I ended up using about 3/4 cup)
  • 3/4 cup creamy peanut butter (not all-natural)
  • 3 tablespoons packed brown sugar (I used 1 tablespoon)
  • 3/4 cup milk chocolate chips
  • 3/4 cup peanut butter chips (or can use just chocolate chips)
  • Graham cracker sticks, chocolate graham cracker animals, apple slices, etc., for dipping

Directions:

  1. Beat together cream cheese, powdered sugar, peanut butter and brown sugar.
  2. Spoon onto a large piece of plastic wrap; bring up all four corners and twist tightly to form a ball.
  3. Freeze for an hour and a half or until the peanut butter ball is firm enough to keep its shape. Mix peanut butter and chocolate chips on a plate. Remove the plastic wrap from the ball. You may need to slightly knead out the cracks and roll it into a perfect ball. Then, roll it in the chocolate and peanut butter chips to completely cover, pressing them into the ball if necessary.
  4. Place the ball on serving dish; keep refrigerated until serving. Serve with the dipping goodies of your choosing!

Prepare to get oohhs and ahhs from guests from a magnificent looking dessert with such a simple recipe!

Question:
What are your favorite party foods to bring? Any recipe suggestions? I would love to share them with the blogging world!

On a related note, my mom and I had lunch at the Peaks of Otter and part of her meal consisted of cream cheese balls rolled in coconut and served on a pineapple ring. Doesn’t that sound like a great party appetizer that adds glam and interest but soooo easy?! I’ll share that one with you when I make it!

Wedding Flashback For Our Two Year Anniversary!

This Tuesday, April 17th is Eric and my two year anniversary! I can’t believe how time flies when you are deeply and totally in love…yes, I am that sappy. So I thought to celebrate our anniversary on our blog, I would share with you our wedding, since I was not yet a blogger. I will also try and show the decorative side of the wedding as well, if you are looking for wedding ideas. I tried to limit the number of pictures, but once I start looking I just get carried away! Anyways, less words and more pictures!

Oh the memories!! I LOVE looking at our wonderful wedding pictures, all thanks to my friend and then co-worker who was our photographer. You can find out how to make him be your photographer (for weddings, holiday cards, baby/family pictures, and so much more) at Design Marie. We got married at Glencliff Manor,a beautiful old home that is an all-in-one wedding place. Thank you to all the people who were a part of our wedding and who have been there for us during these perfect two years!

The Continuance of Cake Pops

A little bit of heaven on a stick. Chocolate encased in chocolate. Just a few ways to describe those little delights called cake pops. Remember this post about holiday inspired cake pops? Remember how excited I was about showing you the result and didn’t show you the process? Well now it is time for the process and many salivating pictures.

The past few weeks have seemed to need a lot of cake pops. Many special occasions happened and cake pops were needed at all. No, no one requested it. I just thought it was needed. But let’s start at the very beginning (it’s a very good place to start…ahh The Sound of Music). First, just bake a sheet cake just like it says on the box.

Mmm, don’t you want to eat it right now? NO! Don’t do it. We will make it even better but first it has to get a little messy. It is time to grab a fork and fork up that cake until it is a pile of fluffy crumbs.

Now, if you are in need of a little taste test, you can take it here. There will be some big chunks of the crustier outside. Feel free to eat those as a little snack, Now its time to make it double chocolate (or double vanilla). Grab your favorite flavor of icing – both chocolate and vanilla work. I tend to go double chocolate! Spoon up a big glob of that icing and start to mix it! This is where it gets tempting to just stop and start spooning it up.

The finished product should not be too wet but malleable enough to form into balls. Putting the whole can of frosting in usually works – never more but sometimes less.

Now it is time to round it into about 1 inch balls. Once those are done, make sure to give them time to firm up in the refrigerator. Since it takes so long to get to this point I usually make these before one day and then finish up the fun, decorating part.

Now we can skip back to the holiday cake pop post to pick up the rest of the steps. To give you a quick run down, gather colored melting chocolate, lollipop sticks, and any sprinkles and decorating icing. All of these can be found at craft stores or Walmart (don’t hate me that I put Walmart in my post – I am trying to be frugal). Melt the chocolate, dip one end of the stick into the chocolate, and then into the cake. Now dip the whole ball into the chocolate. This is where you lose the ball if you don’t let them firm up. Note: if you put them in the freezer and then directly begin this process the whole chocolate will crack in the hardening process as it expands in the unfreezing process. Then it is time for decorating – sprinkles, icing, whatever moves you!
Ready for some final products? I am! First up, we had a going away party for someone at work who got a different job. He worked in Information Systems and the pops were decorated accordingly. This also shows how you can write messages!
If you can’t read it, it says “Thank You Gary” and “BCPSA”.
(Note: if you use Styrofoam, it has an expiration date as the holes get big after a few uses. The result is floppy cake pops that make it hard to display. Huge fan of the white cardboard stand I found at the store specifically for cake pops!)

So these might have been a fail. Look at the green on green. I wrote “Info” and “Sys” on two cake pops and then I tried to draw a phone and computer on the two in the middle. Bet you couldn’t tell what those pictures are without me telling you!

Next event: another friend getting a new job! Does this mean the economy is turning around?! I surprised her with her own special cake pops!

“Congrats Katie” it reads!
Tried to make it a little fun!

Tried to get artsy to make up for the yellow cake pops in my yellow tinted kitchen when taking pictures at night, meaning no natural light to offset the yellow. Don’t know if it worked except to show the drips!

Final occasion, a cookout to celebrate spring. So I thought I would keep them simple and colorful!

Whew! That was quite the cake pop tour! Hope you liked it. Maybe next time I fill get a little fancier … thinking Easter egg cake pops?!

My name is Megan and I am a dessert-aholic.

It’s true. If you know me or even if you have just started following my blog. I love desserts at any time of the day (even for breakfast!). I think they are an important part of life. They make me happy, taste delicious, and are so fun to make. There is no better present or something fun to share with someone. Yet, it is also very important to have balance in your life and to be healthy (remember Monday’s Inspiration?). I have known some people \when they make dessert they say it is going to be unhealthy anyway so why don’t you just make it the best it can be with all the full fat? I am not that person. I always try to do everything low fat and as healthy as possible. Even in my cakes and cookies. So when I came across this blog I fell in love: Chocolate-Covered Katie: The Healthy Dessert Blog. It took making dessert to a whole new level.

I had every intention about blogging about how really tasty her creations are but my best intentions were waylaid by a 3.5 hour meeting at the end of the work day that took it out of me. Excuses, excuses but I was too tired to go to the store. I also knew that if I opted for the after work store run for dessert supplies, I wouldn’t get in my daily exercise that let’s me eat dessert! (I always tell people  I work out so I can eat dessert.) So I thought I would still gush about this delicious sounding blog and showcase a few recipes I am excited about trying.

Cookie dough batter with no dairy and made with…chickpeas is DEFINITELY my first recipe to try! Check it out here!

Flour-less chocolate chip cookies! Find yum here!

Cookie pie made with garbanzo beans?! What?!

Frozen PEANUT BUTTER hot chocolate! Drink up!

So I know I kind of cheated on this post by not actually making anything, but hey, this is something that every home needs right?! I do promise to deliver on following through with Katie’s recipes. I am SO excited about these that last night I stayed up an hour later than usually perusing her blog.

Are there any healthy tips and tricks you use in cooking?!

The best cheesecake ever

It’s another recipe! I can’t help it; I love to bake – especially around the holidays. This cheesecake recipe is one that my fam has made for quite a while. It is great because it takes only a few ingredients, is quick to prepare (although long to bake), and makes TWO pies (or is it cakes? whoever knows…). So when it came time to planning the Christmas dinner menu for my hubby and me I had to figure out the most important part – the dessert! Since the hubs looooves cheesecake of any kind and my only criteria for dessert is that it has chocolate, this was a no brainer. Can I also say I had so much fun shopping for this! I had the day off from work on Friday, as it seemed like the whole world did too, because stores were packed and roads were crammed. But I loved it. I was actually caught humming down the aisles of the grocery store just because I was in a jolly good mood! Gotta love Christmas cheer! Now, let’s get down to business.

Chocolate Cheesecake Recipe
Ingredients
  • 2 chocolate graham cracker crusts
  • 3 packages 8 oz. cream cheese, softened (it still hardens with the reduced fat kind – don’t hate me!)
  • 1 can sweetened condensed milk (14 oz) (fat free here again folks – still tastes delightful!)
  • 3 eggs
  • 2 T vanilla extract
  • 1.5 cups mini chocolate chips
  • 1t flour

Instructions

  1. In large bowl beat cream cheese until fluffy.

2. Gradually add condensed milk, beating until smooth.

3. Add eggs and vanilla. Mix well.

4. In small bowl toss 1/2 cup of mini chocolate chips with flour to coat. Stir into cheese mixture.

5. Pour mixture into crusts. Sprinkle remaining chips evenly over top. (Left is sprinkled, right is not – for comparison’s sake!)

6. Cook at 280 for 55 minutes. Turn off oven and let cool in over for 55 minutes. Cool to room temperature. Refrigerate before serving.

7. Enjoy!

What I am listening to (while posting): She and Him / Volume One

Holiday Cake Pop Extravaganza!

I love dessert. I also don’t consider it dessert unless it has chocolate. So when my friend Clelie and I decided to try and make this new phenomenon called cake pops for a work function (we used to work at the same place), a new chapter of my life opened up!

So what are cake pops? Well they are little chocolate balls of cake on a lollipop stick and dipped and chocolate. They also offer endless ways of decorating them to customize them to specific holidays and situations. Since we have begun to make these we have celebrated birthdays, childbirth, making cake pops for our own leaving work party (we left within weeks of each other and brought our own cake!), and holidays like Christmas that I will share with you today!

Clelie even bought this book to help us get started:

Buy it on Amazon here.

Cake pops are easy to make but are time consuming and require patience. We have found it easier to make the cake (or brownies in this post!) a few days before we decorate. So pick your favorite flavor of cake (we have used chocolate, red velvet, and brownie mix). Bake it like normal and let it cool. Then crumble it up with a fork. Add 3/4 can of your favorite icing (chocolate and white both work well). Stir the cake crumbles and icing together until it makes a malleable mixture – not too sticky but not too crumbly. Just right! Once you have this mixture use your hands to roll them into balls about 1 inch in diameter. Store these in a container in the refrigerator (not freezer or they will crack) until using them. It is important to keep them chilled until making them or your may lose them off the stick! (Oops! Forgot to take pictures of that part.)

When you are ready to continue the process you will need to make sure that you have chocolate candy coating. They sell this in your local craft store in various colors. We have used dye to color the white chocolate but it changed the consistency of the chocolate and made it harder to use. I highly recommend using the colored chocolate. You will also need to have all the decoration supplies you may want, like colored sugar or sprinkles and colored gel to draw on them. Here are our supplies all ready to go:

Now it is time to heat the chocolate. Chocolate is very easy to burn (see my fudge post for melting tips) so we used a double boiler and this worked great! If you don’t have one melt carefully in the microwave. Take one lollipop stick and dip it into the chocolate just a little bit. This helps it grip the pop.

Then stick it into the cake pop almost all the way through so it is on there firmly.

Next roll the pop in the chocolate. Use spoons/spatulas to help cover it completely. You may want to shake it lightly upside down to get rid of excess chocolate.
The hardest part of cake pops is storage. Styrofoam works really well in holding the pops but it can be a little hard to travel with. This is the option we chose to dry ours. This is also a good place to decorate them. We decided to use white M&M’s as a Santa hat topper and used white gel to pipe a fuzzy part of the Santa hat. Instant holiday treats!

We also decided to just make some cake balls using white chocolate and holiday sprinkles. They are harder to photograph but still delicious and festive!

As this was a present for a friend, we decided to dress it up a little for delivery. So we used a jar, holiday M&M’s as filler, and a pretty bow to finish it! I think this may be the best batch ever!